All Sorts Rug Free Crochet Pattern
You might remember this post about all of my recent crochet WIPs. Well, I've got one to share with you today--and it's a free pattern!

I asked my friends on Facebook for name ideas and got so many brilliant ones!! Finally, with help from Christine and Elenore, I settled on the name...
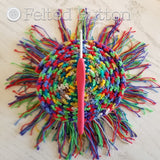
When I got my "hook" into this *Scheepjes Nooodle yarn, I was delighted. It is SUPER soft with no drag on your hook and fingers when you work with it. Because it is a super bulky yarn, however, my hands did get a bit tired, so I worked in little bursts rather a couple marathon sessions.

I asked my friends on Facebook for name ideas and got so many brilliant ones!! Finally, with help from Christine and Elenore, I settled on the name...
because the stripes and colors are so reminiscent of those licorice all-sorts candies that I used to find at my grandma's house. But, I figured if you wanted to make it in your own colors to suit your style and space, the name wouldn't limit your imagination. And the rug could be used in "all sorts" of spaces--kitchen, bath, entry, nursery, bedroom, etc.
Let me tell you the beginnings of this design, and then we'll get on with the very simple pattern!
When I got my "hook" into this *Scheepjes Nooodle yarn, I was delighted. It is SUPER soft with no drag on your hook and fingers when you work with it. Because it is a super bulky yarn, however, my hands did get a bit tired, so I worked in little bursts rather a couple marathon sessions.
The yarn is a 50/50 cotton/polyester blend so will be perfect for durability and washing--precisely why I chose to make a rug with it. I think it would be splendid for baskets, hanging organizers, footstools, or pet beds, too. I see a cat cave or dog bed in the future for me using this yarn.
If you noticed the yarn bowl in the above pic--you've got eyes like mine for all things yarn-loving.
Here's a better view of it. It was a sweet Christmas gift from my friends at Scheepjes last year. It's brilliant for keeping yarn clean and untangled with no "rolling" balls. Plus, it's pretty. You can get your "yarn" into it from Deramore's *here.
Because this pattern is so simple, I think it is perfect for a beginner. I have written the pattern in standard US crochet terms, so here it goes...
- sc = single crochet
- dc = double crochet
- st = stitch
- ch = chain
- rep = repeat
- RS = Right Side
So let's get the rest of the details.
Notes: I haven't used any fancy techniques here. I suggest working into the back bump of your foundation chain across in order to leave the remaining two loops free--a tidier option in my opinion. You can make the color changes wherever you wish. I changed colors at the end of designated rows (see below) by fastening off and beginning the next row by joining with a sc.
- Join with sc: with slip knot on hook, insert hook in first st of row, yarn over and draw through, yarn over and draw through both loops on hook
Gauge: In pattern: 7 rows X 7 sts = 4 inches (10cm)
Dimensions without tassels: 25in X 30.5 in (63.5cm X 77.5cm)
Materials:
~Scheepjes Nooodle yarn -- 9 skeins total (200g/60m or 7oz/65.5yds each skein; total amount needed is about 485m/530yds
- 5 of the multi (#11009)
- 1 each of pink, orange, green and black (#786, #693, #525, #000)
Rug Pattern:
With pink, ch 47
Row 1: working in back bump across, sc in second ch from hook, dc in next, *sc in next, dc in next; rep from * across, turn --23 sc and 23 dc
Row 2: ch 1 (does NOT count as st), sc in first st, dc in next, *sc in next, dc in next; rep from * across, turn
Rep Row 2 following the color changes below or until the rug reaches the desired height.
Color Changes:
Rows 1-2: pink
Rows 3-4: orange
Rows 5-6: green
Rows 7-8: pink
Rows 9-10: orange
Rows 11-12: green
Rows 13-14: pink
Rows 15-16: orange
Rows 17-18: green
Rows 19 -24: multi
Row 25: pink
Rows 26-31: multi
Row 32: orange
Rows 33-38: multi
Row 39: green
Rows 40-45: multi
Row 46: black
Rows 47-52: multi
Row 53 (RS): with black, join with sc in first st, sc in each st across, fasten off --46 sc
With black and RS facing, join with sc at bottom edge of rug in foundation ch, sc in each st across, fasten off --46 sc
Weave in those ends!! I used my hook here, since I didn't have a yarn needle with a large enough eye. But it was speedy quick, so no complaints.
I added tassels to mine for a little extra fun. Here's how I did mine...
I wrapped the black yarn around my little 8in/20cm wide polka-dotted notebook a couple of times to get the length I wanted--about 16 inches/40cm long. Cutting on one edge I was left with 2 16in strands of the yarn for each tassel, since it's full enough with just that, I think. And then I folded both of them in half to make a loop, drawing the loop through every other sc at the edges of the rug with my hook. Then I fed the tails up through the loop and pulled it tightly. They are pretty snug and I'm happy with them. Simple is good, right?
I hope you enjoy this pattern. If you would like to have an ad-free tidy printable PDF, you can find it for download right here in my Felted Button shop or in my Etsy shop for $2 here.
You can share what you make with this pattern on my Facebook page here or in the my own Facebook group here and connect with other like-minded crochet addicts on Instagram (@FeltedButton), too.
You can share what you make with this pattern on my Facebook page here or in the my own Facebook group here and connect with other like-minded crochet addicts on Instagram (@FeltedButton), too.
So many fun things are happening around here. I'll share as soon as I can.
| On the Board | -- Don't look around, look up. ~~Yoon Hwan Choi
* This post contains affiliate links. Thanks for your support.


