Make a Felted Button Bracelet
I love felt, buttons, crocheting and color! (Maybe that's why Felted Button exists?) So I thought today I would pop in to share a little tutorial on how to put my loves to good use in a quick and easy crochet project.
Several years ago I made a bunch of these and sold them in my Etsy shop when it first opened. Here are just a few. (Get ready for a photo-flood.)
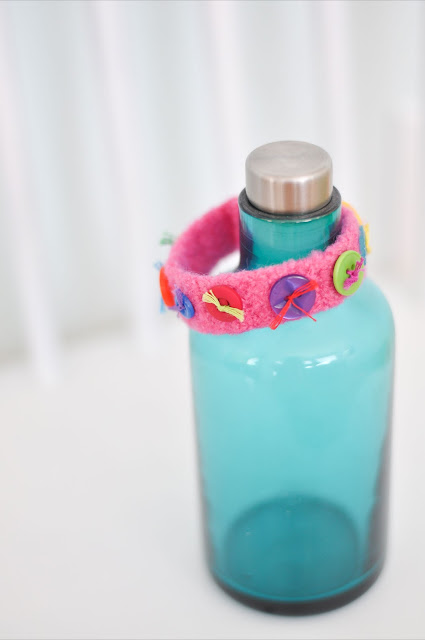
With this last one, I decided to pull it from the shop for myself and I've worn it a ton! By the way, these wool bracelets last forever since felt is incredibly durable. You can add buttons or beads, embroidery, make them striped, or leave them plain. Whatever suits your mood or style. They are super whimsical and let you really have fun creating.
So when I recently felt the urge to make some more--I dug around for my small bits of wool.
Aren't they fun?! I decided to make two bracelets--one with a lovely coral color, and one with a soft seafoam. And I wanted a bunch of buttons for each one.
Let me tell you how I crocheted my bracelets. I wanted mine about 1 inch (2.5cm) wide. So with my 4mm hook, I chained 7. Then I worked dc (US terms) in the 3rd ch from the hook and each ch across. (5 stitches plus the turning ch).
Then turn. I like to do a "stacked sc" instead of a ch-3 turn, but it's not really necessary because the gap that usually exists for a ch-3 dc turn will disappear with felting anyway. (If you want to know how to avoid the gaps of turning chains you can see three ideas here and one more way here. The one shown below is #3 from the first linked blog post.)
So I work in each st across leaving the turning ch unworked. (5 dc). Then turn.
Continue this way working 5 dc on each row until your bracelet measures about 9in (23cm) long. Remember, felting is not a science--but an art--so depending on how tightly you felt your bracelet, and how much you stretch and shape it, you might adjust the dimensions slightly. If you want a wider cuff--work a few more chains.
With the coral one, I turned, slip stitched in the first st, chained 4, skipped 3 stitches, then slip stitched in the last one. After felting it made a pretty small hole, but seemed fine for a smaller button, so I wasn't displeased.
When your felting is done, remember, you can trim your tails off without concern about fraying, trim any edges, corners or fuzzy spots. (Yay for not needing to weave ends!) And don't forget to gently tug and shape before letting it dry. When all is dry, it's time to add the embellishments.
I went with buttons--and lots of them, for both bracelets. I like the whimsy, variety, texture, color and uniqueness they add. Have fun and be creative with yours! Notice in some of the others above, I used embroidery floss to fasten my buttons. Today I decided to simply use the same color yarn as the bracelet to attach my buttons. The first one I sew on is my "fastening" button to make certain it's in the right place for a good fit around my wrist.
Then it's on to digging through my stash for just the right mix.
I went with a monochromatic button scheme on the coral bracelet, but a pastel rainbow on the seafoam one.
I hope you like it and have fun. If you haven't tried your hand at felting--this is the absolutely perfect project to try because it only takes a couple of minutes to crochet and a scrap of yarn. I also think they make a fab project for a newbie crocheter whose stitches are maybe not so even but, alas, will get hidden after felting and they'll be super happy with their finished result!
If you make one--or more--please share! I love to see the inner creative workings of others. You can find me on Facebook here, Instagram here or Pinterest here. (Remember, I'm Felted Button everywhere!)
| On the Board | -- Knowing yourself if the beginning of all wisdom. ~~Aristotle
Several years ago I made a bunch of these and sold them in my Etsy shop when it first opened. Here are just a few. (Get ready for a photo-flood.)
With this last one, I decided to pull it from the shop for myself and I've worn it a ton! By the way, these wool bracelets last forever since felt is incredibly durable. You can add buttons or beads, embroidery, make them striped, or leave them plain. Whatever suits your mood or style. They are super whimsical and let you really have fun creating.
So when I recently felt the urge to make some more--I dug around for my small bits of wool.
Aren't they fun?! I decided to make two bracelets--one with a lovely coral color, and one with a soft seafoam. And I wanted a bunch of buttons for each one.
Let me tell you how I crocheted my bracelets. I wanted mine about 1 inch (2.5cm) wide. So with my 4mm hook, I chained 7. Then I worked dc (US terms) in the 3rd ch from the hook and each ch across. (5 stitches plus the turning ch).
Then turn. I like to do a "stacked sc" instead of a ch-3 turn, but it's not really necessary because the gap that usually exists for a ch-3 dc turn will disappear with felting anyway. (If you want to know how to avoid the gaps of turning chains you can see three ideas here and one more way here. The one shown below is #3 from the first linked blog post.)
So I work in each st across leaving the turning ch unworked. (5 dc). Then turn.
Continue this way working 5 dc on each row until your bracelet measures about 9in (23cm) long. Remember, felting is not a science--but an art--so depending on how tightly you felt your bracelet, and how much you stretch and shape it, you might adjust the dimensions slightly. If you want a wider cuff--work a few more chains.
Now let's make the button loop. I tried two different methods. I think either works fine. Let me show you...
With the coral one, I turned, slip stitched in the first st, chained 4, skipped 3 stitches, then slip stitched in the last one. After felting it made a pretty small hole, but seemed fine for a smaller button, so I wasn't displeased.
With the seafoam bracelet, I turned, chained 1, worked a hdc in the first and next stitch, chained 4, skipped just the center st, then worked hdc in the last 2 before fastening off. Actually, I think this made a nicer button hole--with a bit more room for a larger button and easier to fasten with one hand.
So now, for the felting, since this is such a small project, I just did mine at my kitchen sink by hand. It took me maybe five minutes. I have a complete tutorial on how to hand felt small objects like this here. (It's a tutorial on how to make a wee felted flower garland with simple felting instructions.) Felting is fabulous, I tell ya!
When your felting is done, remember, you can trim your tails off without concern about fraying, trim any edges, corners or fuzzy spots. (Yay for not needing to weave ends!) And don't forget to gently tug and shape before letting it dry. When all is dry, it's time to add the embellishments.
I went with buttons--and lots of them, for both bracelets. I like the whimsy, variety, texture, color and uniqueness they add. Have fun and be creative with yours! Notice in some of the others above, I used embroidery floss to fasten my buttons. Today I decided to simply use the same color yarn as the bracelet to attach my buttons. The first one I sew on is my "fastening" button to make certain it's in the right place for a good fit around my wrist.
Then it's on to digging through my stash for just the right mix.
I went with a monochromatic button scheme on the coral bracelet, but a pastel rainbow on the seafoam one.
I hope you like it and have fun. If you haven't tried your hand at felting--this is the absolutely perfect project to try because it only takes a couple of minutes to crochet and a scrap of yarn. I also think they make a fab project for a newbie crocheter whose stitches are maybe not so even but, alas, will get hidden after felting and they'll be super happy with their finished result!
If you make one--or more--please share! I love to see the inner creative workings of others. You can find me on Facebook here, Instagram here or Pinterest here. (Remember, I'm Felted Button everywhere!)
| On the Board | -- Knowing yourself if the beginning of all wisdom. ~~Aristotle


