Free Scheepjes Catona Pattern for NatCroMo
It's National Crochet Month! I'm so happy to be a participant on the Crochetville NatCroMo Blog Tour. In celebration, I would like to share with you a free crochet pattern I showed off last week here using one of my favorite yarns ever--Scheepjes *Catona. I hope you enjoy it! I named it:
Materials:
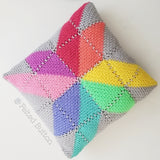
Crisscross Catona Cushion Cover
Materials:
- D (3.25mm) hook
- 14" (35cm) square pillow insert
- 6 buttons (approx. 7/8"/2.2cm)
- Yarn -- *Scheepjes Catona (100% Mercerized Cotton); one 25g ball of each color, two additional 50g balls of #242 (14 balls total/approx 700 yds)
- #128
- #172
- #179
- #212
- #240
- #242
- #258
- #391
- #392
- #395
- #396
- #399
Stitch abbreviations: (US Terms)
- sc = single crochet
- sk = skip
- st(s) = stitch(es)
- sl st = slip stitch
- rep = repeat
- sp(s) = space(s)
- ch = chain
- RS = right side
- hdc = half double crochet
- BLO = back loop only
- FLO = front loop only
Special Stitch:
- picot--ch 3, sl st in first ch
Gauge: 9 hdc X 8 rows = 2"
Dimensions: 13.5" square with .5" negative ease
Note: Ch 1 at the beginning of a row or round does not count as a stitch.
Note: Ch 1 at the beginning of a row or round does not count as a stitch.
Front Cushion Cover: Make one of each color (12 total)
Ch 16
Row 1: sc in 2nd ch from hook and each ch across, turn --15 sc
Row 2: ch 1, sc in first st, (ch 1, sk 1, sc in next) rep across, turn --8 sc, 7 ch-1 sps
Row 3: ch 1, sk first sc, sc in ch-1 sp, (ch 1, sk sc, sc in next ch-1 sp) rep across through last ch-1 sp, ch 1, sc in top of last sc, turn --8 sc, 7 ch-1 sps
Rep Row 3 until piece measures 13 inches high, fasten off and weave ends
After all 12 pieces are made, weave them (I did it randomly with no particular order--or you can follow the color pattern I used in the picture) and pin or fasten together at the ends using those nifty little mini alligator clips--you know, the ones that look like this:
Row 2: ch 1, working in FLO across, hdc in first st and each st across, turn
Row 3: ch 1, working in BLO across, hdc in first st and each st across, turn
Rows 4-30: Rep Rows 2-3 until piece measures 9 in high, ending on Row 2 rep, fasten off, weave ends
Attach buttons, insert your pillow form and put your pillow somewhere pretty!
I hope you like this fun cover! I know that I do. It's found a happy place in my living room. Now I'm tempted to make several more since it's a perfect project for on-the-go and the Catona comes in sooo many gorgeous colors!
Ch 16
Row 1: sc in 2nd ch from hook and each ch across, turn --15 sc
Row 2: ch 1, sc in first st, (ch 1, sk 1, sc in next) rep across, turn --8 sc, 7 ch-1 sps
Row 3: ch 1, sk first sc, sc in ch-1 sp, (ch 1, sk sc, sc in next ch-1 sp) rep across through last ch-1 sp, ch 1, sc in top of last sc, turn --8 sc, 7 ch-1 sps
Rep Row 3 until piece measures 13 inches high, fasten off and weave ends
After all 12 pieces are made, weave them (I did it randomly with no particular order--or you can follow the color pattern I used in the picture) and pin or fasten together at the ends using those nifty little mini alligator clips--you know, the ones that look like this:
Front Cover Border: Note--You'll be working in the round with the RS facing throughout and through both thicknesses.
Rnd 1: With #242, join with sl st in any corner, ch 1, *(3 sc in corner sp, work 48 sc evenly along side across (approx 8 sc/strip); rep from * on other 3 sides, join with sl st to first sc --50 sc each side + corner sts
Rnds 2 - 3: ch 1, sc in same st as joining and each st along sides, placing 3 sc in each corner, join with sl st to first sc, fasten off, weave ends --54 sc each side after Rnd 3 + corner sts
Back Cushion Cover:
- Bottom Placket:
Row 2: ch 1, working in FLO across, hdc in first st and each st across, turn
Row 3: ch 1, working in BLO across, hdc in first st and each st across, turn
Rows 4-30: Rep Rows 2-3 until piece measures 9 in high, ending on Row 2 rep, fasten off, weave ends
- Top Placket (Buttonholes):
Rows 1-29: Complete as for Bottom Placket, ending on Row 3 rep
Row 30: ch 1, working in FLO across, hdc in first st and next 3, ch 1, sk 1, *hdc in next 8, ch 1, sk 1; rep from * 4 mores times, hdc in last 4, turn
Row 31: ch 1, working in BLO across, hdc in first st and each st across, turn
Row 32: ch 1, sc in first, sc in next, picot, sk next, sc in next, *picot, sk next, sc in next; rep from * across, fasten off, weave ends --26 picots
Assembly: Holding wrong sides of front and both back covers together with top placket over bottom and using #242 with tapestry needle, whipstitch together through BLO.
Notice that the needle is inserted only through the back loops on both the front and back covers--always being inserted in the same direction. Down the rough sides of the back plackets simply pick a loop at the edge.
Be mindful that where the front and back plackets overlap in the center you will be working through three layers of fabric--so make certain to "catch" all three.
Attach buttons, insert your pillow form and put your pillow somewhere pretty!
I hope you like this fun cover! I know that I do. It's found a happy place in my living room. Now I'm tempted to make several more since it's a perfect project for on-the-go and the Catona comes in sooo many gorgeous colors!
This pattern has not been tested, so if you find any errors, please let me know!
Thanks for stopping by and joining in the fun on this NatCroMo Blog Tour. You can also follow along on their Facebook page here.
I've got more exciting things on and off my hook--as well as in my swirling head--so stay in the Button Loop.
Instagram (@FeltedButton)
And if you happened to miss my most recent pattern you can find the Parrotlet's Flight Blanket pattern in my shop here.
| On the Board| -- Start each day with a grateful heart.
*This post contains affiliate links. Thank you for your support.


