
Warp and Weft Blanket {Free Crochet Pattern}
Hello!! I hope life is good for you and there is plenty of time for crochet and color! Today I'm sharing the free crochet pattern for my Warp and Weft Blanket. It's a bit of traditional granny squares with a modern twist. See...

This blanket design began with a little box of heaven...

Would you look at those fabulous colors? The Scheepjes Stone Washed/River Washed Colour Pack* contains all 36 Stone Washed colours, as well as 14 colors of River Washed in cute 10g DK balls. This Colour Pack is also available as an XL (aran/worsted) variety containing 15g balls of all 50 colors. I had both, but decided for this design that I was going to work my main color in Scheepjes Colour Crafter which is DK weight so went with the regular SW/RW. I don't mind mixing fibers here (SW/RW is acrylic/cotton blend while the Colour Crafter is premium acrylic) since they are both soft with similar texture and drape--and they are both washable!

I love how they come in this sweet little box--all showing their colorful little cutie pie faces. The box even has a little handle. For this person with "compulsive containerism" it's simply perfect.

When all was said and done, I used 48 of the 50 colors. I have a friend who tested this pattern for me and she's using the larger 50g balls of Stonewashed for her main color. I'm looking forward to seeing it!
I am often rubbish at coming up with names for my designs so asked folks on Facebook. Thanks for those with the brilliant suggestions! Since I thought this one looked woven, I chose the name Warp and Weft Blanket. These are the two basic components used when weaving--warp being the stationary fibers that are tight while the weft are the fibers woven through the warp. Now let's get on with the pattern details below. (By the way, if you are wanting a tidy PDF without all the extras in between, you can purchase it for a small fee in my own Felted Button shop here, or Etsy or LoveCrafts shops.)
Skill Level: Easy (Since it's just a little twist on a traditional granny this rating suits, and the pattern reading is pretty simple. The only tricky bit might be if you choose to do the join-as-you-go if you've never done it, but if you have, then it's easy peasy.
Materials:

Dimensions/Gauge:


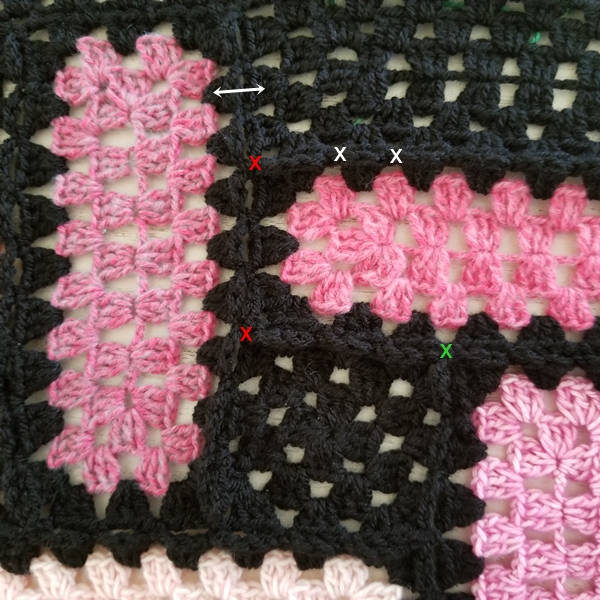
This picture shows the joining positions of the motifs. Notice that they are joined along each side at the ch-1 spaces with a sl st to the neighboring square's ch-1 space and at the corners with a sl st to the neighbor's ch-3 corner space. The red Xs are places where you will need to sl st to both the upper and left neighbor (internal corners) when joining at the corner. The green X marks the position where the black square would begin joining to the upper right rectangle as you work Rnd 3. The two white Xs show regular sl st joins. Also, note that with all of the joining, the neighbor's Cl is directly across from your working motif's Cl.


This blanket design began with a little box of heaven...
Would you look at those fabulous colors? The Scheepjes Stone Washed/River Washed Colour Pack* contains all 36 Stone Washed colours, as well as 14 colors of River Washed in cute 10g DK balls. This Colour Pack is also available as an XL (aran/worsted) variety containing 15g balls of all 50 colors. I had both, but decided for this design that I was going to work my main color in Scheepjes Colour Crafter which is DK weight so went with the regular SW/RW. I don't mind mixing fibers here (SW/RW is acrylic/cotton blend while the Colour Crafter is premium acrylic) since they are both soft with similar texture and drape--and they are both washable!
I love how they come in this sweet little box--all showing their colorful little cutie pie faces. The box even has a little handle. For this person with "compulsive containerism" it's simply perfect.
When all was said and done, I used 48 of the 50 colors. I have a friend who tested this pattern for me and she's using the larger 50g balls of Stonewashed for her main color. I'm looking forward to seeing it!
I am often rubbish at coming up with names for my designs so asked folks on Facebook. Thanks for those with the brilliant suggestions! Since I thought this one looked woven, I chose the name Warp and Weft Blanket. These are the two basic components used when weaving--warp being the stationary fibers that are tight while the weft are the fibers woven through the warp. Now let's get on with the pattern details below. (By the way, if you are wanting a tidy PDF without all the extras in between, you can purchase it for a small fee in my own Felted Button shop here, or Etsy or LoveCrafts shops.)
Skill Level: Easy (Since it's just a little twist on a traditional granny this rating suits, and the pattern reading is pretty simple. The only tricky bit might be if you choose to do the join-as-you-go if you've never done it, but if you have, then it's easy peasy.
Materials:
• Yarn
|
Color (CC)
|
Color (CC)
|
||
|
Colorado (#941 - RW)
|
A
|
Mckong (#943 – RW)
|
AA
|
|
Yarra (#949 - RW)
|
B
|
Tourmaline (#836 – SW)
|
BB
|
|
Blue Apatite (#805 - SW)
|
C
|
Fostertite (#826 – SW)
|
CC
|
|
Amazonite (#813 - SW)
|
D
|
Congo (#954 – RW)
|
DD
|
|
Smokey Quartz (#802 - SW)
|
E
|
Pedirot (#827 – SW)
|
EE
|
|
Obsidian (#829 – SW)
|
F
|
Moonstone (#801 – SW)
|
FF
|
|
Lilac Quartz (#818 - SW)
|
G
|
Ganges (#945 – RW)
|
GG
|
|
Deep Amethyst (#811 - SW)
|
H
|
Rose Quartz (#820 – SW)
|
HH
|
|
Wheaton (#950 - RW)
|
I
|
Malachite (#825 – SW)
|
II
|
|
Green Agate (#815 - SW)
|
J
|
New Jade (#819 – SW)
|
JJ
|
|
Rhine (#952 - RW)
|
K
|
Lemon Quartz (#812 – SW)
|
KK
|
|
Brown Agate (#822 – SW)
|
L
|
Citrine (#817 – SW)
|
LL
|
|
Garnet (#810 – SW)
|
M
|
Mississippi (#946 – RW)
|
MM
|
|
Lepidolite (#830 - SW)
|
N
|
Rhodochrosite (#835 – SW)
|
NN
|
|
Larimar (#828 – SW)
|
O
|
Seine (#947 – RW)
|
OO
|
|
Severn (#953 – RW)
|
P
|
Yellow Jasper (#809 – SW)
|
PP
|
|
Danube (#948 – RW)
|
Q
|
Pink Quartzite (#821 – SW)
|
QQ
|
|
Boulder Opal (#804 – SW)
|
R
|
Beryl (#833 – SW)
|
RR
|
|
Steenbras (#942 – RW)
|
S
|
Carnelian (#823 – SW)
|
SS
|
|
Corundum Ruby (#808 – SW)
|
T
|
Red Jasper (#807 – SW)
|
TT
|
|
Canada Jade (#806 – SW)
|
U
|
Nile (#944 – RW)
|
UU
|
|
Amazon (#951 – RW)
|
V
|
Morganite (#834 – SW)
|
VV
|
|
Turquoise (#824 – SW)
|
W
|
Coral (#816 – SW)
|
WW
|
|
Axinite (#831 – SW)
|
X
|
Enstatite (#832 – SW)
|
XX
|
- 328yds/300m
- 3.5oz/100g
- 100% premium acrylic
- 3 balls of Ede (MC)
- 24yds/26m
- .35oz/10g
- 78% Cotton; 22% Acrylic
- 1 ball each color
- 24yds/26m
- .35oz/10g
- 78% Cotton; 22% Acrylic
- 1 ball each color
• Hook—G (4.0mm)
• Tapestry or yarn needle for weaving those rascally ends
Some Notes:
• The Riverwashed and Stonewashed yarns can be purchased in a Scheepjes Colour Pack* of .35oz/10g balls with all 48 colors included. Approximately .25oz/7g was used of each color of RW/SW.
• Ch 1 at the beginning of a round does NOT count as a stitch.
• All joining is completed with a slip stitch.
• Refer to the Placement Diagram for color placement of motifs.
• Round 3 is the join-as-you-go round for all motifs.
--If you do NOT wish to join-as-you-go, complete directions for Rnd 3 as written for your first and all additional motifs and join using your preferred method.
--If you wish to join-as-you-go, complete Rnd 3 as written for the first motif. For second and additional motifs, follow the directions under Joining for Rnd 3.
• Motifs are worked in rounds with RS facing throughout. They are joined as you go to one another, if preferred, on the final round after which the blanket is bordered. The pom edging is then added with WS facing.
Aren't those little poms just so much fun? I decided to make the border multi-colored with the poms changing every little bit. It's a happy, bobbly border, I think. It does require a few more ends to weave, but that is most often the price if you want a bit of fun color--and it's always worth it to me!
Dimensions/Gauge:
Gauge is not super critical to this project--I had some of all of the colors left but I suggest you make a square motif with the 4mm hook and see if it comes out to the correct size. Mine was 3.25" (8.3cm). If you are smaller, try going up a hook size; if you are larger go down a hook size.
My final blanket including the border measured 42in (107cm) X 55in (140cm), which is a fabulous crib size blanket or small throw.
Stitch Abbreviations:
These are the stitch abbreviations I used in this pattern. Remember, they are US terms!
CC = Contrasting Color
sc = single crochet
ch = chain
sk = skip
Cl(s) = Cluster(s)
sl st(s) = slip stitch(es)
dc = double crochet
sp(s) = space(s)
MC = Main Color
st(s) = stitch(es)
rep = repeat
WS = Wrong Side
Rnd(s) = Round(s)
yo = yarn over
RS = Right Side
Special Stitches:
• Cluster (Cl)—3 dc in same space (This is the typical "granny" stitch)
• stacked sc (counts as dc)—insert hook in designated st or sp, yo and draw through, yo and draw through both loops on hook (sc made), insert hook in left leg of sc just made, yo and draw through, yo and draw through both loops on hook [Note: This stitch is meant to replace a ch-3 (counts as dc) to start a round and will always be the first st of the first cl of a round. If you need additional help with stacked sc see Option #3 at the link here. You may use a ch-3 if you prefer.]
•join with sc—with slip knot on hook, insert hook in designated sp, yo and draw through, yo and draw through both loops on hook (This is used for both the joining of the pom edgining, but also for the first sc of a stacked sc when beginning Rnd 3 of the Colorful Rectangle Motifs
• pom—in third ch from hook, puff (see below), ch 3, puff, sl st to bottom of first puff
• puff—(yo, insert hook in designated st, yo and draw through, yo, and draw through two loops) 3 times, yo and draw through all 4 loops on hook
Let me show you how things are laid out for this blanket:
Notice that the color letters can be found in the yarn chart above. You can lay them out the same way, I did, but you can also choose your own arrangement. All of the unlabeled rectangles and squares are made with the main color (MC) or black in my sample. So here's how to make the rectangles...
Main Color (MC) Rectangles (Make 14):
Rnd 1 (RS): with MC, ch 22, in third ch from hook (2 dc, ch 3, Cl, ch 3, Cl), ch 1, sk 2, (Cl in next ch, ch 1, sk 2) 5 times, (Cl, ch 3, Cl, ch 3, Cl) in last ch, working on opposite side of foundation ch into same sts as the previous Cls, ch 1, sk 2, (Cl in next ch, ch 1, sk 2) 5 times, join to first dc --7 Cls each side, 1 Cl each end
Rnd 2: sl st in next 2 to ch-3 sp, ch 1, (stacked sc, 2 dc, ch 3, Cl) in ch-3 sp, ch 1, *(Cl, ch 3, Cl) in next ch-3 sp, ch 1, (Cl in next ch-1 sp, ch 1) 6 times; rep from * once more, join to first dc –8 Cls each side, 2 Cls each end
Rnd 3: sl st in next 2 to ch-3 sp, ch 1, (stacked sc, 2 dc, ch 3, Cl) in ch-3 sp, ch 1, *Cl in next ch-1 sp, ch 1, (Cl, ch 3, Cl) in next ch-3 sp, ch 1, (Cl in next ch-1 sp, ch 1) 7 times,* (Cl, ch 3, Cl) in next ch-3 sp; rep from * to * once more, join to first dc,fasten off –9 Cls each side, 3 Cls each end
Here you can see the solid colored rectangles compared to the colored ones. Essentially, the third round of the colorful rectangles changes to the main color on the third and final round. Here's where you get to make a decision...either your favorite method of joining motifs, or join-as-you-go. Remember, if you are going to do join-as-you-go, then your first motif will be completed Rnds 1-3 as written. But the second and following motifs (no matter what kind--rectangle, colorful rectangle, or square) will be worked through Rnd 2 as written and then you will follow these join-as-you-go instructions for Rnd 3...
Join-As-You-Go:
Motifs are joined-as-you-go while working Round 3. Replace each ch-1 between Cls with a sl st to the adjacent neighboring motif’s ch-1 sp. When joining to one motif at a corner, the second ch of the ch-3 corner is replaced with a sl st to the neighboring motif’s adjacent corner before continuing the working motif. When joining to two motifs at the corners, sl st to both the ch-3 corner sp of the neighbor above and the ch-3 corner sp of the neighbor to the left before continuing the working motif.
This picture shows the joining positions of the motifs. Notice that they are joined along each side at the ch-1 spaces with a sl st to the neighboring square's ch-1 space and at the corners with a sl st to the neighbor's ch-3 corner space. The red Xs are places where you will need to sl st to both the upper and left neighbor (internal corners) when joining at the corner. The green X marks the position where the black square would begin joining to the upper right rectangle as you work Rnd 3. The two white Xs show regular sl st joins. Also, note that with all of the joining, the neighbor's Cl is directly across from your working motif's Cl.
Colorful Rectangle Motif (Make one of each color A-XX; 48 total):
Rnd 1 (RS): with CC, ch 22, in third ch from hook (Cl, ch 3, Cl, ch 3, Cl), ch 1, sk 2, (Cl in next ch, ch 1, sk 2) 5 times, (Cl, ch 3, Cl, ch 3, Cl) in last ch, working on opposite side of foundation ch into same sts as the previous Cls, ch 1, sk 2, (Cl in next ch, ch 1, sk 2) 5 times, join to first dc –7 Cls each side, 1 Cl each end
Rnd 2: sl st in next 2 to ch-3 sp, ch 1, (stacked sc, 2 dc, ch 3, Cl) in ch-3 sp, ch 1, *(Cl, ch 3, Cl) in next ch-3 sp, ch 1, (Cl in next ch-1 sp, ch 1) 6 times; rep from * once more, join to first dc, fasten off –8 Cls each side, 2 Cls each end
Rnd 3: with MC, (stacked sc--join with sc for first sc of stacked sc, 2 dc, ch 3, Cl) in ch-3 sp, ch 1, *Cl in next ch-1 sp, ch 1, (Cl, ch 3, Cl) in next ch-3 sp, ch 1, (Cl in next ch-1 sp, ch 1) 7 times,* (Cl, ch 3, Cl) in next ch-3 sp; rep from * to * once more , join to first dc, fasten off –9 Cls each side, 3 Cls each end
Main Color (MC) Square Motif (Make 35):
With MC, ch 3, sl st to first ch to form ring
Rnd 1 (RS): stacked sc, 2 dc, ch 3, (Cl, ch 3) three times, join to first dc –1 Cl each side
Rnd 2: sl st in next 2 to ch-3 sp, ch 1, (stacked sc, 2 dc, ch 3, Cl) in ch-3 sp, ch 1, (Cl, ch 3, Cl, ch 1) 3 times in next ch-3 sp, join to first dc –2 Cls each side
Rnd 3: sl st in next 2 to ch-3 sp, ch 1, (stacked sc, 2 dc, ch 3, Cl) in ch-3 sp, ch 1, Cl in next ch-1 sp, ch 1, *(Cl, ch 3, Cl) in ch-3 sp, ch 1, Cl in next ch-1 sp; rep from * 2 more times, fasten off –3 Cls each side
Here's how to work the border--which is almost just a granny border but with a couple of differences.
Border:
Rnd 1: with MC and in any ch-3 corner sp, join with sc, ch 3, sc in same sp as joining, ch 3, *(sc in next ch-sp, ch 3) rep to corner, (sc, ch 3, sc, ch 3) in ch-3 corner sp; rep from * two more times omitting final corner, join to first sc
Rnd 2: sl st to next ch-1 sp, ch 1, stacked sc, 2 dc, ch 1, *(Cl in next ch-1 sp, ch 1) rep to corner, (Cl, ch 3, Cl, ch 1) in ch-3 corner sp; rep from * around, join to first dc
Rnds 3-4: work as for Rnd 2 placing (Cl, ch 1) in each ch-1 sp and (Cl, ch 3, Cl, ch 1) in each ch-3 corner sp, join to first dc
Rnd 5: sl st to next ch-1 sp, ch 1, sc in same ch-1 sp, ch 3, work as for Rnd 1 placing (sc, ch 3) in each ch-1 sp and (sc, ch 3, sc, ch 3) in each ch-3 corner sp, join to first sc, fasten off
Rnd 6:with any color (A-XX) and working on WS of blanket, join with sc to any corner ch-3 sp, *[ch 6, pom (see Special Stitches), ch 3, sc in next ch-sp] rep 4 more times, fasten off, with next color of choice, [join with sc in same st as where you fastened off the previous color, (ch 6, pom, ch 3, sc in next ch-sp) rep 4 more times, fasten off] rep around (Note: The long sides of the blanket will only have 4 poms of last color used rather than 5. You can see this in the photo above.)
Now is the time to weave in those ends and make things look beautiful! I chose to block mine, but it didn't really need it, I just like the more professional finish I get.
I hope you enjoy the pattern a bunch! I know that it is happily draped over the arm of my sofa so I can grab it for little extra warmth, and I love it!
My fabulous testers helped with this one, but the border didn't get tested, so if you find errors, please let me know. Oh, and I'll do a little tutorial on my pom edging (also included in the PDF) in a different post really soon!
So, poise those hooks, snag that yarn, and lets get weaving crocheting!
I've got a monster huge blanket project that just rolled off my hook yesterday but still needs a border. I actually dreamed that I was asking everyone how to border it--so maybe I'll do just that and ask for suggestions on my Facebook and Instagram pages here and here.
Tomorrow is Mother's Day here in the US, so I'll be celebrating with my Mom and family--my daughter is cooking!! I hope you enjoy your day, too, whether you are celebrating or not.
| On the Board | -- No one has failed who keeps trying and keeps praying.
~~Jeffrey R. Holland

*This post contains affiliate links which if used by you may provide me a small commission but do not cost you any more. Thanks so much for helping me provide more free patterns on my blog.
Related Posts
Elan Blanket Crochet Pattern
Go ahead. Ask me how many works-in-progress I have right now. Guess what? I'm not going to admit how many there are. ...
Read More
Neighborhood Scarf Free Crochet Pattern
Today is free pattern day! Below is the free crochet tutorial for my Neighborhood Scarf which I introduced and explai...
Read More
Neighborhood Scarf Reveal -- In Honor of Mr. Rogers
Last week I teased you with some unusual photos from my latest creation. And then I began a story that I'm going to f...
Read More