::Berries & Blooms Christmas Garland--Free Crochet Pattern::
I've been thinking of you! And thought I would like to share a simple little free Christmas crochet pattern with you!
It only requires little bits of wool in five colors--but you could work it up in colors of your choice--for anywhere or anyone, not just Christmas. Goodness, you could even make it out of cotton, and obviously not felt it, in colors for a baby nursery or a happy spot in your reading corner. It would even make a sweet gift.
Materials:
- Small Bits of Patons Classic Wool (100% wool) or other feltable worsted weight wool yarn. I used the following colors:
- Bright Red • Jade Heather • Winter White • Lemongrass • Seafoam
- Hook – G (4.5mm)
- Tapestry needle
- Buttons – optional, your choice of color and size
- Baker’s twine or yarn for stringing your berries and blooms
- Rubber gloves and small bits of hand/dish soap (if hand-felting)
- Lingerie bag and wee bit of laundry soap (if machine-felting).
To note, for this project, gauge is not critical. Before felting, my flowers were 3.5 inches (9cm) from point to point. After felting they measure 2.75 inches (7cm) but it doesn't really matter the size of yours. See below for the felting instructions.
Special Stitches:
- Magic ring: See below for details, if it's new to you
- 2dc-dec (2 dc decrease): yo, insert hook through first st, yo, pull through st, yo, pull through 2 loops on hook, yo, insert hook through next st, yo, pull through st, yo, pull through 2 loops on hook, yo, pull through all three loops on hook
- Picot: ch 3, sl st in first ch
- htr (half treble (triple) crochet): yo twice, insert hook in designated st, yo and draw up a loop, yo and draw through two loops on hook, yo and draw through all 3 loops on hook
Stitch Abbreviations in US Terms:
- ch = chain
- dc = double crochet
- htr = half treble crochet
- Rnd = Round
- sc = single crochet
- sl st = slip stitch
- st = stitch
- tr = treble (triple) crochet
- yo = yarn over
Berries: (make 2 in each of five colors)
Magic ring
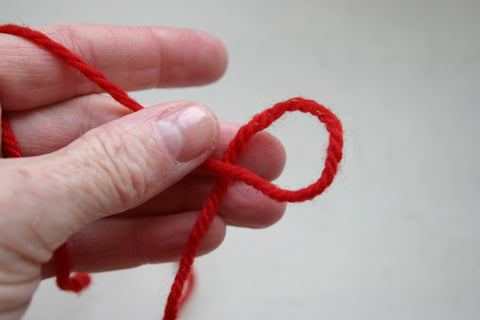
Place the tail of your yarn in a loop and behind the yarn feeding from the ball.
Place your thumb over the intersection. Insert your hook through the ring and draw a loop through.
Yarn over and pull through the loop on your hook. This chain will hold the ring in place and counts as a chain stitch. If you are one of those that worries about the security of the magic ring, remember that the felting will lock all the fibers into place and keep things from unraveling.
Rnd 1: 12 dc in ring, pull tail to close ring tightly, join with sl st to first dc (12dc)
Rnd 2: ch 1, sc in same st as join and each st around, join with sl st to first sc (12 sc)
Rnd 3: ch 1, beginning in the same st as joining, 2dc-dec (see Special Stitches), 6 times, join with sl st to first st (6 sts)
Fasten off, leaving a 5 inch (12cm) tail for closing top of ball. Tuck beginning tail inside the ball. Using a tapestry needle, pick up front loop only of each st of Rnd 3 and pull tail to close the top of the ball. Guess what, you don't need to weave ends if you don't want to--because you can trim everything off after felting. Neato, huh?
Flowers: (make four—one in each color except red)
Magic ring
Rnd 1: 12 dc in ring, pull tail to close ring tightly, join with sl st to first dc (12dc)
Rnd 2: beginning in same st as join, *[ch 1, dc, htr, tr, picot, (tr, htr, dc, ch1, sl st) in next st, repeat from * 6 times around (6 petals). Fasten off and weave in ends.
Center Puffs: (make four—one for each flower—in red)
Complete Rounds 1 and 2 of the ball. Fasten off leaving a 6 inch (15cm) tail for attaching puff to center of flower. Place puff in center of flower and with tail, attach puff with a running stitch (up and down) through flower and puff in each stitch of Rnd 1. Weave in end and fasten off.
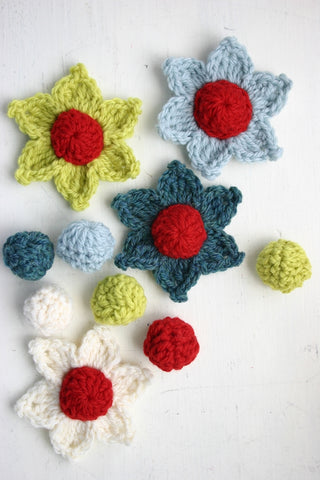
This is what they look like before felting.
Now let's get on with the wet-felting...
Felting Materials: IF MACHINE-FELTING
- Washing machine – hot wash cycle
- Small amount of laundry soap
- ¼ Cup baking soda (optional)
- Item(s) for increased agitation (pair of flip flops, tennis balls, pair of faded jeans)
- Lingerie bag
OR IF HAND-FELTING (my preference for small pieces like these)
- Rubber Gloves (for protecting hands from heat and agitation)
- Small amount of liquid soap
- Bowl of hot water—I like to put mine in the sink to reduce mess
Felting Instructions:
Felting is not always a precise science. That is because it is achieved by exposing wool to water, heat, and agitation, but the amount of each of these elements plays a part in the way the piece felts.
Machine-Felting:
- Place pieces in a lingerie bag (optional but because the pieces are small they might otherwise get “lost”)
- Place in washing machine. A top-loading machine is preferable, as a front-loading washing machine provides less agitation so will take considerably longer to felt.
- Add a small amount of laundry detergent and ¼ cup of baking soda (optional—helps to felt more quickly). Put in a pair of faded jeans, tennis balls or clean flip flops for additional agitation. A towel is okay but generally leaves lint on the wool which then needs to be picked off. (Again, another reason why a lingerie bag is helpful.)
- Using lowest water level, run a Hot/Cold wash cycle.
- After one cycle, check for stitches. Remember when felting, the wool seems to expand and stretch before it felts. Just keep felting! Just keep felting! Repeat as necessary. Darker yarns will always felt more quickly and thoroughly, and white wool is a bit stubborn. You may need to continue felting until the white shows no visible stitches.
- Run through the rinse and dry spin cycle or hand rinse in cold water and squeeze to dry.
- Lay felted pieces onto a dry towel, away from direct heat or sunlight. Shape to correct dimensions. Here is where you can gently tug and stretch, straighten and smooth to make your pieces look perfect. Don’t assemble it until it is thoroughly dry! And never use a clothes dryer unless you want a miniature garland version!
Hand-Felting
- With a bowl of VERY hot water and rubber gloves, place a pea-size drop of liquid soap in your palm and item(s) to be felted, saturate the piece(s) with water and begin rubbing vigorously between your palms. You can do several of the berries at the same time as the agitation between them will facilitate felting. Continue rubbing and occasionally re-wetting until the stitches are no longer visible. Rinse well.
- Lay felted pieces onto a dry towel, away from direct heat or sunlight. Shape to correct dimensions. Here is where you can gently tug and stretch, straighten and smooth to make your pieces look perfect. Hint: Rolling the berries between your palms like making clay balls will help to smooth and round them. Don’t assemble your garland until it is thoroughly dry. And never use a clothes dryer unless you want a miniature garland version!
Assembling Garland:
Using a needle and baker’s twine or yarn (about 50 inches), string the berries and flowers, placing them in an arrangement of your choice with a button (optional) at the tip of two adjacent petals on each flower. I placed two berries between each flower and looped the twine at each end to create a loop for hanging.
The Berries and Blooms Bunting PDF pattern is printable so that you can take it with you wherever you go and need not sit at the computer or cut and paste it yourself. I also made the PDF so that you can print the written portion and leave off the picture section where I included quite a few more pictures to assist you. If not, the additional photo-tutorial pictures should be helpful on those tricky spots. Thanks, again, for your support!
The puffy centers of the flower, along with the berry balls are just so fun! Yes, very fun, indeed!
FELTED with BUTTONS!! Who would have thought you would find that here, huh? I hope you enjoy it, dear friends!
By the way, if you haven't been to my Felted Button Facebook page--please stop over and like it. That way you won't miss out on any new projects, patterns and discounts! Besides, I love keeping in touch with my hooky friends!
Peace and hugs.
