Spring into Summer with a FREE Crochet Blanket Pattern
I'm calling it Spring into Summer Blanket...
...because it seems to be the perfect project for working on as things warm up (well, at least on this side of the world!).
I love the corner-to-corner stitching, because essentially you can work the width until just under half your yarn is used up (remember extra for the border) and then start to decrease. The repeat is so simple, too, that once mastered it doesn't take much brain energy. That's a good thing for me!!
But, of course, the thing I love the MOSTEST about this blanket is the COLOR!! The yarn is Red Heart Unforgettable in the Candied colorway. The super long color runs do all of the striping for you and guess what??? No ends!! Well, only when one skein ends and the other begins. You don't even fasten off to start the border!! Wahoo!
Isn't that border just so stinkin' cool the way it blends those colors? You never know exactly which one will happen next. It's a little happy color surprise every round.
So let's get on with the pattern:
Materials:
- Red Heart Boutique Unforgettable in Candied (3 skeins for baby blanket)
- (100% acrylic; 3.5oz/100g; 280yds/256m)
- Hook—H (5mm)
- Tapestry needle
Gauge is important if you want to have enough yarn to complete the border rounds. If you don't want to check your gauge, I suggest buying an extra ball or two.
- Gauge: In pattern, 7 rows = 4in (10cm) (measured diagonally from beginning corner)
- Dimensions: Baby Blanket—32in (82cm) X 32in (82cm)
Stitch Abbreviations in US Terms:
- ch = chain
- RS = right side
- dc = double crochet
- sc = single crochet
- hdc = half double crochet
- sl st = slip stitch
- hl of hdc = horizontal loop of hdc
- sp = space
- rep(s) = repeat(s)
- st(s) = stitch(es)
- Rnd = round
Just a few notes about the pattern:
- Making adjustments to the dimensions of the blanket is simple, as the pattern is worked diagonally until the desired blanket width is achieved before decreasing rows are begun. Estimating yarn quantities then requires using about half of your yarn before beginning the decrease pattern. Be certain to allow extra yarn for the border.
- All joining is completed with a slip stitch (sl st) unless otherwise stated.
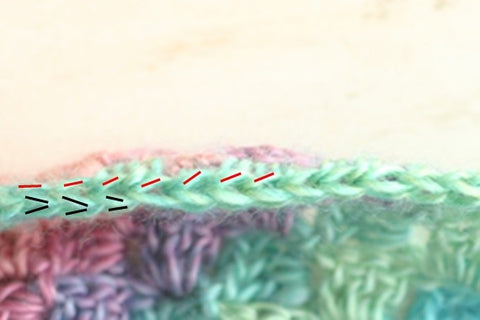
There's only one Special Stitch in this pattern and it's sometimes referred to as a camel stitch or "working into the third loop". I call it the horizontal loop of a hdc. Here are the details:
- hl (horizontal loop of hdc)—this loop is located just behind and nearly parallel to the loops of the hdc that are normally worked. The pair of normal loops are shown below by the black lines. The red lines indicate the hl of each half double crochet (Figure 1). The needle is shown inserted through the hl (Figure 2) on the wrong side of the work.


For the blanket stitch pattern, you'll begin by increasing from a corner until the blanket reaches the designated width...
Increasing Rows—
Row 1 (RS): ch 6, dc in 4th ch from hook, dc in next 2 (1 block made)
Row 2: ch 6, dc in 4th ch from hook, dc in next 2, flip Row 1 vertically, (sl st, ch 3, 3 dc) in ch-3 sp of previous row (2 blocks made)
Row 3: ch 6, dc in 4th ch from hook, dc in next 2 ch, *(sl st, ch 3, 3 dc) in next ch-3 sp of previous row; rep from * twice; turn (3 blocks made)
Row 4: ch 6, dc in 4th ch from hook, dc in next 2 ch, *(sl st, ch 3, 3 dc) in next ch-3 sp of previous row; rep from * three times; turn (4 blocks made)
Continue in this manner, increasing 1 block on each row until there are 42 blocks across.
Once you are at the proper width, it's time to decrease..
Decreasing Rows—
Row 43: slip st across first 3 dc, * (slip st, ch 3, 3 dc) in next ch-3 space of previous row; repeat from * to last ch-3 space; slip st in last ch-3 space; turn, do NOT make a block in last space (41 blocks).
Repeat Row 43 for decreasing block pattern.
Do NOT fasten off. Continue with border.
Border:
Rnd 1: with RS facing, work 3 hdc in each ch-3 (or around post of dc) and hdc in each dc around, completing 3hdc in each corner st or sp, join to first hdc
Rnd 2-6: hdc in hl (see Special Stitches) of each st around, completing 3hdc in center st of 3hdc at each corner, join to first hdc
Fasten off at end of Rnd 6.
Weave in ends and block as desired.
If you would like to help support me in my little blogging venture, you can purchase the PDF for a small fee on Felted Button or in my Etsy shop here. The PDF contains extra pictures (over 25 in all, with additional explanations for each image) for extra help, too! Your support means the world to me and allows me to continue blogging and providing free patterns! Thanks a bunch!
Enjoy your little Spring into Summer!!
Remember to keep in the "Button Loop" by staying connected with me on Facebook and Pinterest. It's a load of colorful fun!
| On the Board | -- A mother can exert an influence unequaled by any other person in any other relationship. --D. Todd Christofferson


